Steps of converting the app
It is possible that you already have an Android app that is making money. And if you are reading this, decide that you want to double your success and move the app to iOS?
You did right in the first place. In most cases, it’s better to start a mobile app with one platform and then move to another platform. The most famous example is Instagram – it started as an iPhone-only app and then moved to Android only one and a half year later – you can read more about this super-successful case here https://techcrunch.com/2012/04/24/the-rise-of-instagram-tracking-the-apps-spread-worldwide
Moving Android apps to iOS might be considered easy, but unfortunately, it is not the point if your app is anything more sophisticated than a calculator app. The reasons for this:
- Android and iOS have different design guidelines, and the UI for the apps sometimes has to differ significantly to be approved by a moderator; for example, look at WhatsApp for Android and iOS. Even disregarding colors, screenshots look like they are of 2 different apps. The navigation is located very differently;
- Apple is much more strict about app notifications when moderating an app, while Android gives a lot of flexibility to the users and allows them to select which notifications they want to receive.
- Apple always uses human moderators, while on Android you can skip with automated moderation
- Android and iOS are very different technologically. iOS runs binary code, while Android runs the so-called byte-code. Speaking the simple language, the difference is like between gasoline and electric cars – the innards are as different as it can get, while on the surface it might look very similar.
But there are also some good points:
- Creating a responsive layout of an iOS app is a breeze after doing the same for Android. iPhones have much, much less different screen sizes, and they are much closer to each other performance-wise. So if you have the hard experience of Android, working on iOS will be a walk in the park
- iPhone users spend more per app on average. If your app earns money with Android users, there is a high chance that you will earn more per-user on iOS
Step 1: review the basic functionality of the app
Just as you had a fundamental design process when creating your app for Android, it will also be your first step when moving the app to iOS. Try to recollect all the design documents you had for your MVP on Android. When you have them, revise them and edit them to represent your vision of the iOS app.
Just as with your first Android app, it might be a good idea to have gradual releases every few weeks. Do not underestimate differences in platforms – it might be that some 3rd party library that you depend on does not exist on the other platform, and this will significantly change your plans. It is possible to account for such small things, but you just never can be sure. So it is better to roll out piece by piece and try to work around the difficulties as they appear.
And not only speaking about 3rd party libraries, but obstacles can also happen with:
- push notifications
- UI language
- size of the screen
- app access rights
- platform API possibilities
- user authorization (touch vs Face ID)
- security requirements
You may do this work yourself or hire a specialist. This is pretty much technical work and does not require your attention as the core ideologist. you might look for a software product manager for this task.
As a result of step 1, you should end up with your new high-level spec for the iOS app that has:
- All the main screens
- All the functionality from the user-side perspective (under the hood details are not described)
- Monetization strategy
- Market analysis
Step 2: In-depth work on adopting the app
In the first step, you pinpointed the differences between iOS and Android. This is very important, but in step 2 you have to dive into the details.
iOS vs. Android UI Design: The Main Differences
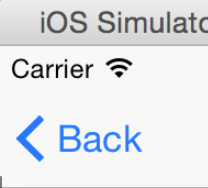
1. Change the UI to account for no built-in ‘back’ button
Remember that iOS does not have a default ‘back’ button. On Android devices, there was always a hardware ‘back’ button, later replaced with a built-in ‘back’ button of Android on the screen. Android has offered the software option from the earliest versions, but they were a backup option until 2015 mostly.

iOS has never had a default ‘back’ button. So on each screen, you have to think of a place where you could put this ‘back’ button while not crumpling the UI.
To make sure you do everything right, get yourself familiar with the platform’s guidelines: Human Interface Guidelines (HIG) for iOS and Material Design for Android.
An important thing to notice is that even the measurement units for iOS and Android are different: iOS uses pt, while Android apps should use dp. Android uses dp because it has many more displays to accommodate, so its system is a little more advanced. DP’s are density-independent pixels, so your image has the same size while having different pixel density: hdpi, xhdpi, xxhdpi, and xxxhdpi. In iOS it is the other way around: you provide pictures of different resolutions (1x, 2x, and 3x) and iOS selects the resolution based on the device.
2. Android: elevation, iOS – flat. The importance of elevation in Material
One of the important differences in the UI concepts of Android and iOS is that Android represents the screen as a multi-level field. Widgets can be higher and lower, with higher widgets casting shadows onto the lower ones. So a lot of detail in Android UI comes with shadows.
On the other hand, iOS has almost no shadows. You can find shadows in App Store though, but it is more an exception. And when you migrate your app from Android to iOS, you should plan not to have shadows if you plan to follow HIG.
An important question of step 2: can we just port the Android UI to iOS with little to no changes?
If you ask this question, then we have good news for you: yes you can! A lot of apps look almost identical on Android and iOS, even with the ‘Back’ button in Android where it can be skipped as having no additional value.
So, if you plan to do it quick and easy, just make sure to include the ‘Back’ button everywhere, check the layout of the screens on the iPhone or iPad resolutions and pixel density, and your UI will be good to go!

iOS Human Interface Guidelines (HIG)
Android Design Guide
But there are also some good points:
- Creating a responsive layout of an iOS app is a breeze after doing the same for Android. iPhones have much, much less different screen sizes, and they are much closer to each other performance-wise. So if you have the hard experience of Android, working on iOS will be a walk in the park
- iPhone users spend more per app on average. If your app earns money with Android users, there is a high chance that you will earn more per-user on iOS
Here are the most important differences that UX/UI designers need to take into account when “translating” an app from iOS to Android or vice versa (to learn more, you can visit https://learnui.design/blog/ios-vs-android-app-ui-design-complete-guide.html ):
| DESIGN ELEMENT | IOS | ANDROID |
| Minimum tap target size | 44×44 pt | 48×48 dp (What’s a dp?) |
| Main app navigation | Bottom nav | Tabs at top of screen |
| Secondary app navigation | Bottom nav “More” OR on-page UI | Bottom nav OR “hamburger button” side menu |
| Primary button/action | Top nav, right side | Floating action button |
| Secondary actions | On-page UI | Top nav, right side |
| Single-choice lists | List with checkmark for selected item | Radio button list |
| Multiple-choice lists | List with switches OR list with checkmarks for selected items | Checkbox list OR list with switches |
| Confirm or allow undo of destructive actions | Modal dialog to confirm choice | Allow Undo via temporary on-screen notifications |
Step 3: the actual development
When your UI design is prepared to be moved to the other platform, and you have decided on the functionality that will be moved or maybe even introduced, it is time to start implementing the port.
The first technical issue is finding all the 3rd party dependencies. As you may know, modern apps are only 10-20% are independent creations. Most of the inner workings of the apps are taken from open-sourced or proprietary binary collections of code called libraries. Examples of libraries are:
- Internet connectivity
- FaceID, TouchID
- Image filters
- and many, many, many more
The worst part is that you have no guarantee that an open-source library A that you used for Android will have a counterpart in iOS. It is a fifty-fifty chance that you will have to use another open-source library B that does some things differently or even lacks some functionality. It happens all the time.
For the most proprietary libraries, you will find both iOS and Android versions. That means, for payment gateways and social networks you will also have a library both for Android and iOS.
All that being said, migrating an app from Android to iOS is a development task of almost the same effort as building the original app for Android. The difference might in that you already have the audience, you know all the screens and you can make the architecture of the app simpler and better.
Step 4: quality assurance
An important last step is quality assurance. You are not building an MVP now, and your audience expects a well-built and working app.
Types of tests:
- Functional testing
- Integration testing
- Security testing
- Performance and Load testing
Except for these highly technical tests that can yield a well-working app that no one needs, there are also tests targeted at your target audience:
- validation tests
- usability tests
- acceptance tests
We will cover these types of testing in our blog in the future articles
It is possible that you have built your Android app without tests. it is not very uncommon that the first version of apps does not have a lot of testing due to cost cuts. When you are extending your app to a new market, another approach should be taken – as the risk costs are higher and you have only one try in taking over iOS market (you wouldn’t change the app name now if something goes wrong, right?), you should test your app rigorously. Testing is usually taking 25-35% additional development time if done well. This time is not a time wasted, and an amazing number of errors are found and fixed during this period.
Conclusion
Migrating Android app to iOS might seem like a simple task, but if done right, it will take almost the same amount of time as building the original Android app, including analysis of target audience and feature design.
